• This forum is the machine-generated translation of www.cad3d.it/forum1 - the Italian design community. Several terms are not translated correctly.

how to align view of intersection in orthogonal view?

  • Thread starter Thread starter reggio
  • Start date Start date

reggio

Guest
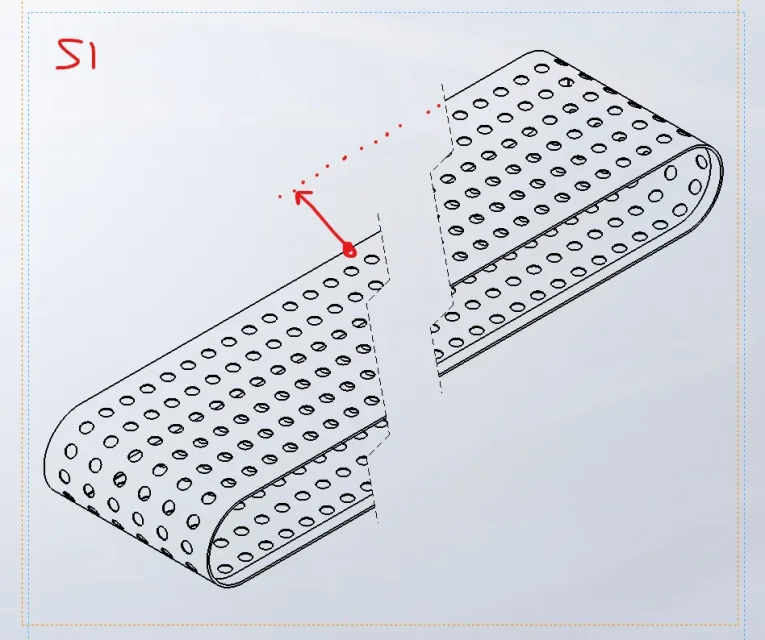
hi, when we have long and narrow details, it is necessary to use intersection view, but if you want to represent the view in orthogonal happens that head and tail remain very far away from each other creating a bulky and not understandable view.

at the moment I fill up on double views and manual alignment, but sometimes you can not do this way...
would you suggest how to do to get an orthogonal view, with intersection and correctly aligned?1726208279872.webp
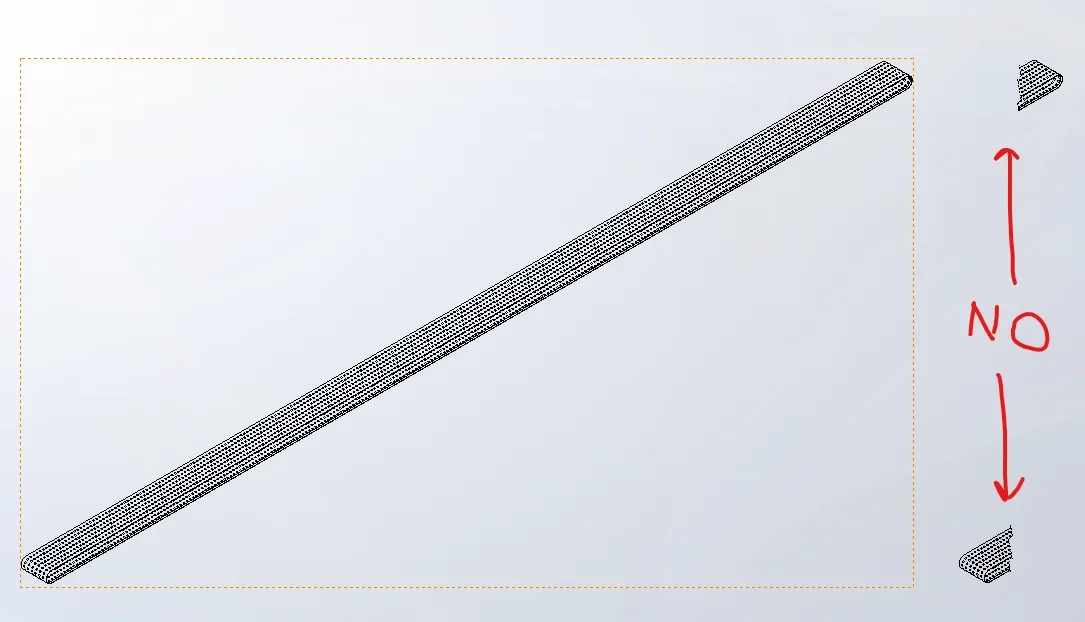
1726208383949.webp
 
both are wrong, the two ends are always aligned, as if the piece was only one but shorter, then interrupted with two lines that can also be broken.
 
he asked "how to make the pizza dough" and you said "you could be gluten intolerant."

at this point, in solidwork (section in which the question was posted), you know how to get the view with the handwritten "yes" (if you prefer, aligned as you say, so is it also "right")?

because the question was this.
 
both are wrong, the two ends are always aligned, as if the piece was only one but shorter, then interrupted with two lines that can also be broken.
That's exactly what you're asking...

in the second image has treated what should be the common thread of the two views.. ;)

Cooomunque, net of misunderstanding, is a thing on which I had christonate in the past finding a very little orthodox way, because you lose the connection with the model.
but using it only for details on board design every now and then I run the risk. .

I make the view a sketch, I create the lines that interest me to align them
1726219142052.pngwith sketch tools I align manually and then block everything.
It's a little slutty as a principle, but I get to the result I want. .
1726219199686.pngbut I repeat, it is a force, which in case of heavy modifications to the model is remade.
 
I don't use solid but inventor, so I'm sorry if I say cauliflower.
with inventor I make my side view or from above, I interrupt so as to "accorciarla", then of the latter I make a view projected in assonometry. so doing the 2 trunks are aligned. If the shortened main view doesn't need I can suppress it so as not to have it on the sheet.
even in inventor if I realize the view directly from the absolute does not come true.
solidworks the infamous (for him only blades) when you create an isometric view from an interrupted view creates it whole. .
 
I hope it has also merits che
if you worsen with commitment and constancy, push strong on the development of useless things, abandoning profits from 2010 to today you feel a value, then I recommend you solidpork
 
I tried with "model break view" from the insert menu (in model environment) . in the table you can choose to view it as an explosion and the views remain close and aligned.
 
if you worsen with commitment and constancy, push strong on the development of useless things, abandoning profits from 2010 to today you feel a value, then I recommend you solidpork
I have been working for a while with solid edge, with inventor I had done some training but I never realized projects. I suggest you try others too and you will see that solidworks will be better than you see it now.
 
That's exactly what you're asking...

in the second image has treated what should be the common thread of the two views.. ;)

Cooomunque, net of misunderstanding, is a thing on which I had christonate in the past finding a very little orthodox way, because you lose the connection with the model.
but using it only for details on board design every now and then I run the risk. .

I make the view a sketch, I create the lines that interest me to align them
View attachment 72095with sketch tools I align manually and then block everything.
It's a little slutty as a principle, but I get to the result I want. .
View attachment 72096but I repeat, it is a force, which in case of heavy modifications to the model is remade.
Whereas in all parameters the sketch solutor has no performance comparable to a cad2d, I would avoid this method regardless.
 

Forum statistics

Threads
44,997
Messages
339,767
Members
4
Latest member
ibt

Members online

No members online now.
Back
Top