

The Abaqus Associative Interface is tailored to integrate with SOLIDWORKS users. It provides a direct channel to transfer geometry from SOLIDWORKS to Abaqus/CAE. With this interface, users can easily send individual components or a full assembly from SOLIDWORKS to Abaqus/CAE using a single click. Moreover, if you update your model in SOLIDWORKS, you can swiftly import those changes to Abaqus/CAE without losing any pre-defined analysis settings. This integration is made possible by a plugin for SOLIDWORKS and is managed via the CAD Connection tools in Abaqus/CAE.
Installation Procedure
Get the Plugin
The plugin typically comes packaged with the Abaqus installation files, which can be downloaded from https://software.3ds.com. Please refer to How to Install Abaqus for more information.
You can obtain the plugin in two different ways:
-
- In the Abaqus installation directory (you will have to extract two extra archives to get to this directory) AM_SIM_Abaqus_Extend.AllOS\1\SIMULIA_Abaqus_AI\SIMULIA_Abaqus_AI.AllOS\1\SolidWorks_2.7_Associative_Interface\SAI_2.7\SAI_2.7
-
- Visiting https://software.3ds.com and downloading the plugin from there (shown below).
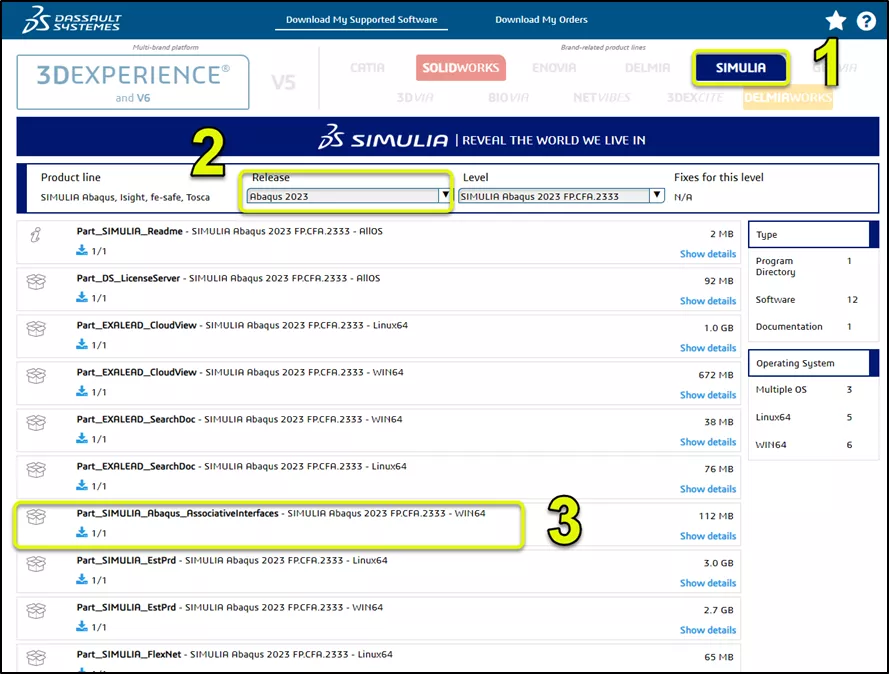
- Visiting https://software.3ds.com and downloading the plugin from there (shown below).
Add Plugin to SOLIDWORKS
Prerequisites
-
- Ensure you have administrative privileges on your computer.
-
- SOLIDWORKS must be installed and licensed on your system prior to adding the plugin.
Installation Steps
-
- Launch SOLIDWORKS as a Windows administrator. You can do this in two ways:
-
-
- From the Start menu, Shift + right-click on SOLIDWORKS and choose Run as administrator from the context menu.
-
-
-
- Similarly, from the desktop, Shift + right-click on SOLIDWORKS and select Run as administrator.
-
-
- Once in SOLIDWORKS, go to File > Open from the main menu.
-
- In the Files of type field, choose Add-Ins (*.dll).
-
- Navigate to the directory containing the add-in file. Select the appropriate .dll file and click Open.
-
- SOLIDWORKS will then install the “SOLIDWORKS Associative Interface” add-in.
Enabling the SOLIDWORKS Associative Interface Add-in
-
- Launch the SOLIDWORKS main menu and navigate to Tools > Add-Ins. This action will prompt the Add-Ins dialog box to appear.
-
- Within the Add-Ins dialog box is the SOLIDWORKS Associative Interface add-in labeled Abaqus/CAE under the Other Add-ins section.
-
-
- To activate the add-in for the current session, check the box in the Active Add-ins column.
-
-
-
- If you wish to ensure the add-in is enabled for every SOLIDWORKS session, check the box in the Start Up column.
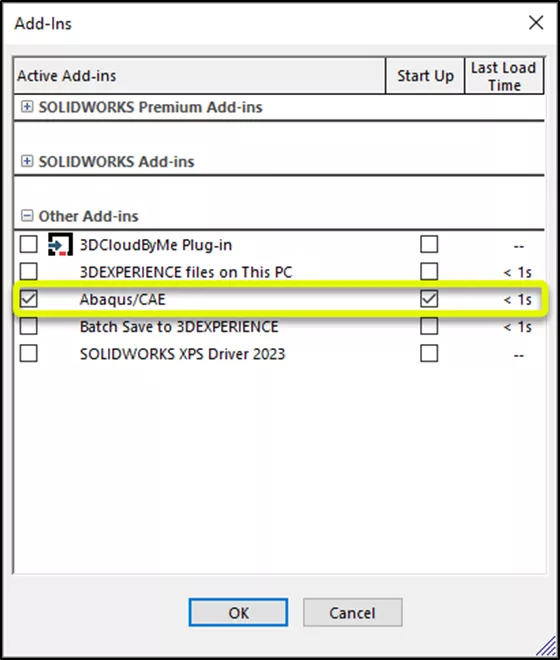
- If you wish to ensure the add-in is enabled for every SOLIDWORKS session, check the box in the Start Up column.
-
-
- Once you’ve made your selection, click OK.
Following the activation, if you enabled the Active Add-ins option for the SOLIDWORKS Associative Interface add-in, you’ll notice that Abaqus is now available in the SOLIDWORKS main Tools menu.
Additionally, the Export to Abaqus/CAE icon ![]() will be present in the SOLIDWORKS toolbar.
will be present in the SOLIDWORKS toolbar.
Using the Associative Interface Plugin
-
- Begin by launching Abaqus/CAE and proceed to the Assembly module.
-
- In the main menu bar, navigate to Tools > CAD Interfaces > SOLIDWORKS.
-
- A SOLIDWORKS dialog box will appear. Here, opt for Auto-assign port and click Enable. Abaqus/CAE will display the assigned port number in the message area. Should you wish to assign a specific port, you can do so by clicking Specify port and entering the desired port number.
-
- Now, initiate SOLIDWORKS and load the model you intend to export.
-
- Click on the Export to Abaqus/CAE option, which will be displayed in the SOLIDWORKS PropertyManager.