• This forum is the machine-generated translation of www.cad3d.it/forum1 - the Italian design community. Several terms are not translated correctly.

gd&t symmetry

Fabrizio Magi

Guest
Bye to all,

I have a doubt about the use of geometric tolerances of symmetry. I always use a single plan like datum (or axis in a 2d view) not to stumble into misunderstandings.
But I happen to see in some drawings even more than one datum, for example two perpendicular planes between them or two parallel axes between them.
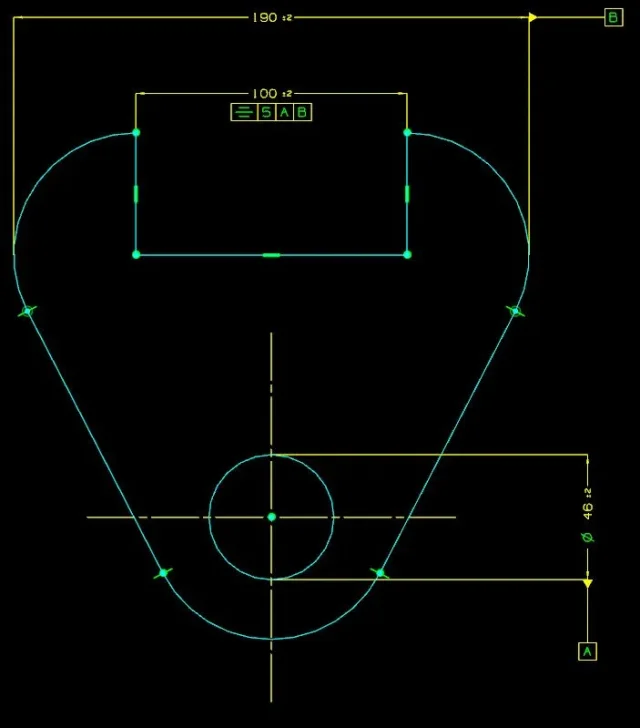
according to you is correct quotation in figure 1? I honestly would have quoted symmetrical compared to only a. But I could understand who says that symmetry is compared to the plane formed by the axis to and from the median point of the b.
Cattura.webp
 
I personally no longer use geometric tolerance of symmetry. quoting everything, size of the slot and distance of a wall compared to another reference, tolerant what you need. too susceptible to different interpretations than your idea.
 
Bye to all,

I have a doubt about the use of geometric tolerances of symmetry. I always use a single plan like datum (or axis in a 2d view) not to stumble into misunderstandings.
But I happen to see in some drawings even more than one datum, for example two perpendicular planes between them or two parallel axes between them.
according to you is correct quotation in figure 1? I honestly would have quoted symmetrical compared to only a. But I could understand who says that symmetry is compared to the plane formed by the axis to and from the median point of the b.
View attachment 62994
Why complicate life to those who have to read the drawing?
I would have done a passing symmetry axis throughout the piece, quoted from that and given a position tolerance to the hole on the symmetry axis.
also because the datum a is the hole, a symmetry of the cast compared to a hole does not seem very correct.
 
exact, in addition to making little "saddle" the design with excessive tolerances, I agree on the incorrectness of the indication of symmetry regarding the hole (or its axis of revolution).

the particular is symmetrical with respect to the vertical axis therefore the hole would fall on the axis and the remaining processing the symmetrical indirections with respect to that.
 
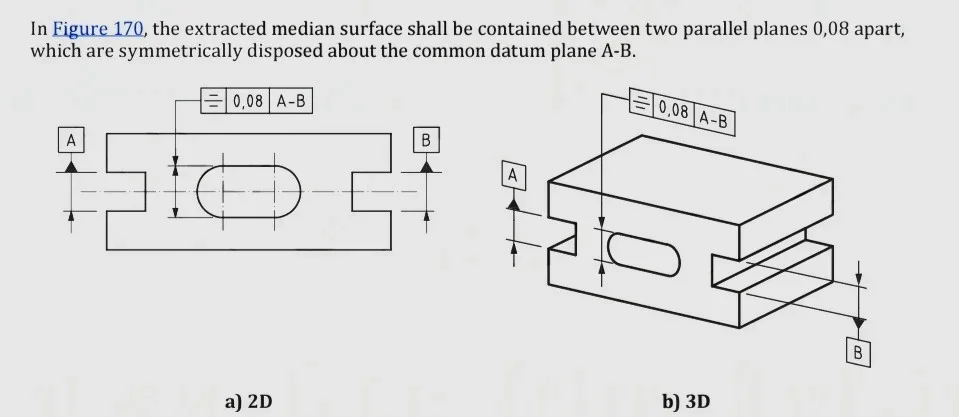
the standard iso 1101 clarifies the use of symmetry with two datums.Screenshot_20210804_222510-01.webpthe indication is very clear because it clearly uses the concept of symmetry of the central quarry within a value of 0.08 between the quarry below and the one above.
I see no doubtful interpretations.
certainly you prefer to pull the axis of symmetry and quota everything with cl and not to put anything as geometric tolerances. ...depends on who produces the piece and in what environment we are ...we in the steel industry do not have much confidence on geometric tolerances except for details of precision and accuracy pushed a little extraordinarily. then the suppliers know a priori that the tolerance of the machine for everything else is enough....but that time the piece is out...it was fixed or remade....in certain sectors it works.
 
Good. Thanks for the answers but I'm not convinced. in particular the piece will not necessarily be symmetric, so the simplification of the symmetry works in this case but not in others.
As for the two datums, this is actually a fairly simple case in which the two datums are actually representative of only one interpolating plan the two, precisely a-b and not a|b. in the specific case of the iso, if b was the axis of a hole and not the average plan of a slot, it would work the same I imagine. but if a and b were two axes of two holes ideally parallel? Maybe even in that case a-b would work.
 
the standard iso 1101 clarifies the use of symmetry with two datums.View attachment 62999the indication is very clear because it clearly uses the concept of symmetry of the central quarry within a value of 0.08 between the quarry below and the one above.
I see no doubtful interpretations.
certainly you prefer to pull the axis of symmetry and quota everything with cl and not to put anything as geometric tolerances. ...depends on who produces the piece and in what environment we are ...we in the steel industry do not have much confidence on geometric tolerances except for details of precision and accuracy pushed a little extraordinarily. then the suppliers know a priori that the tolerance of the machine for everything else is enough....but that time the piece is out...it was fixed or remade....in certain sectors it works.
does not seem so clear to me the example used by the norm, those datum a and b seem to refer to the upper inner plane of the quarries, so the symmetry should be compared to the plans? what do you deduce from the theoretical axis of the quarries?
In addition, in the isometric view, the datum a is on the upper face, the b on the lower one.
 
simply must be symmetrical with respect to two references, whether flat or axis. There's nothing else to interpret.
the rest of the symmetries or tolerances is not indicated in the examples....ovvio
 
does not seem so clear to me the example used by the norm, those datum a and b seem to refer to the upper inner plane of the quarries, so the symmetry should be compared to the plans? what do you deduce from the theoretical axis of the quarries?
In addition, in the isometric view, the datum a is on the upper face, the b on the lower one.
if "support" the datum right on the arrow of the quota (in the example, the width of the quarry), then it is meant that the datum is the theoretical axis. I don't say it, the norm says it.
 
if "support" the datum right on the arrow of the quota (in the example, the width of the quarry), then it is meant that the datum is the theoretical axis. I don't say it, the norm says it.
I didn't remember this finesse.
I would then be curious to make a survey and see how many in the workshops are able to interpret it correctly :lol:
 
I didn't remember this finesse.
I would then be curious to make a survey and see how many in the workshops are able to interpret it correctly :lol:
in fact some of the general rules of gd&t (especially in a course are among the first things that are transmitted) are related to this, and are based on the relationship with the supplier:
1. ask if they use them
2. ask for their available tolerances (machines etc)
3. ask how they verify their work
this just to avoid giving information that create confusion instead of helping.
 

Forum statistics

Threads
44,997
Messages
339,767
Members
4
Latest member
ibt

Members online

No members online now.
Back
Top